使用 RBAC 與 JWT 驗證 (JWT validation) 保護你的 ASP.NET Core API
本指南將協助你透過 角色型存取控制 (RBAC, Role-based Access Control) 以及 Logto 簽發的 JSON Web Token (JWT),為你的 ASP.NET Core API 實作授權 (Authorization) 機制,確保 API 安全。
開始前
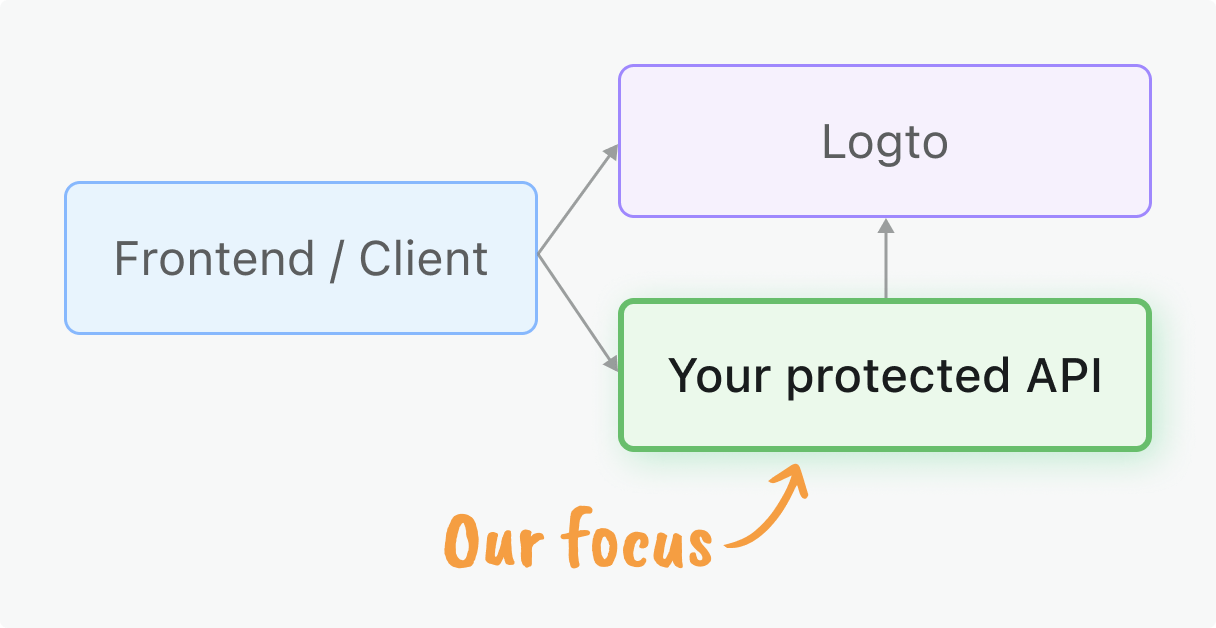
你的用戶端應用程式需要從 Logto 取得存取權杖 (Access tokens)。如果你尚未完成用戶端整合,請參考我們針對 React、Vue、Angular 或其他前端框架的 快速入門,或伺服器對伺服器存取請參閱 機器對機器指南。
本指南聚焦於在你的 ASP.NET Core 應用程式中,對這些權杖進行伺服器端驗證。
你將學到
- JWT 驗證: 學習如何驗證存取權杖 (Access tokens) 並擷取驗證 (Authentication) 資訊
- 中介軟體實作: 建立可重複使用的中介軟體以保護 API
- 權限模型: 理解並實作不同的授權 (Authorization) 模式:
- 全域 API 資源 (Global API resources) 用於應用程式層級端點
- 組織權限 (Organization permissions) 控制租戶專屬功能
- 組織層級 API 資源 (Organization-level API resources) 用於多租戶資料存取
- RBAC 整合: 在 API 端點強制執行角色型權限 (Role-based permissions) 與權限範圍 (Scopes)
先決條件
- 已安裝最新版穩定版 .NET
- 基本了解 ASP.NET Core 與 Web API 開發
- 已設定 Logto 應用程式(如有需要請參閱 快速入門)
權限 (Permission) 模型總覽
在實作保護機制前,請先選擇最適合你應用程式架構的權限模型。這與 Logto 的三大授權 (Authorization) 情境相符:
- 全域 API 資源 (Global API resources)
- 組織(非 API)權限 (Organization (non-API) permissions)
- 組織層級 API 資源 (Organization-level API resources)
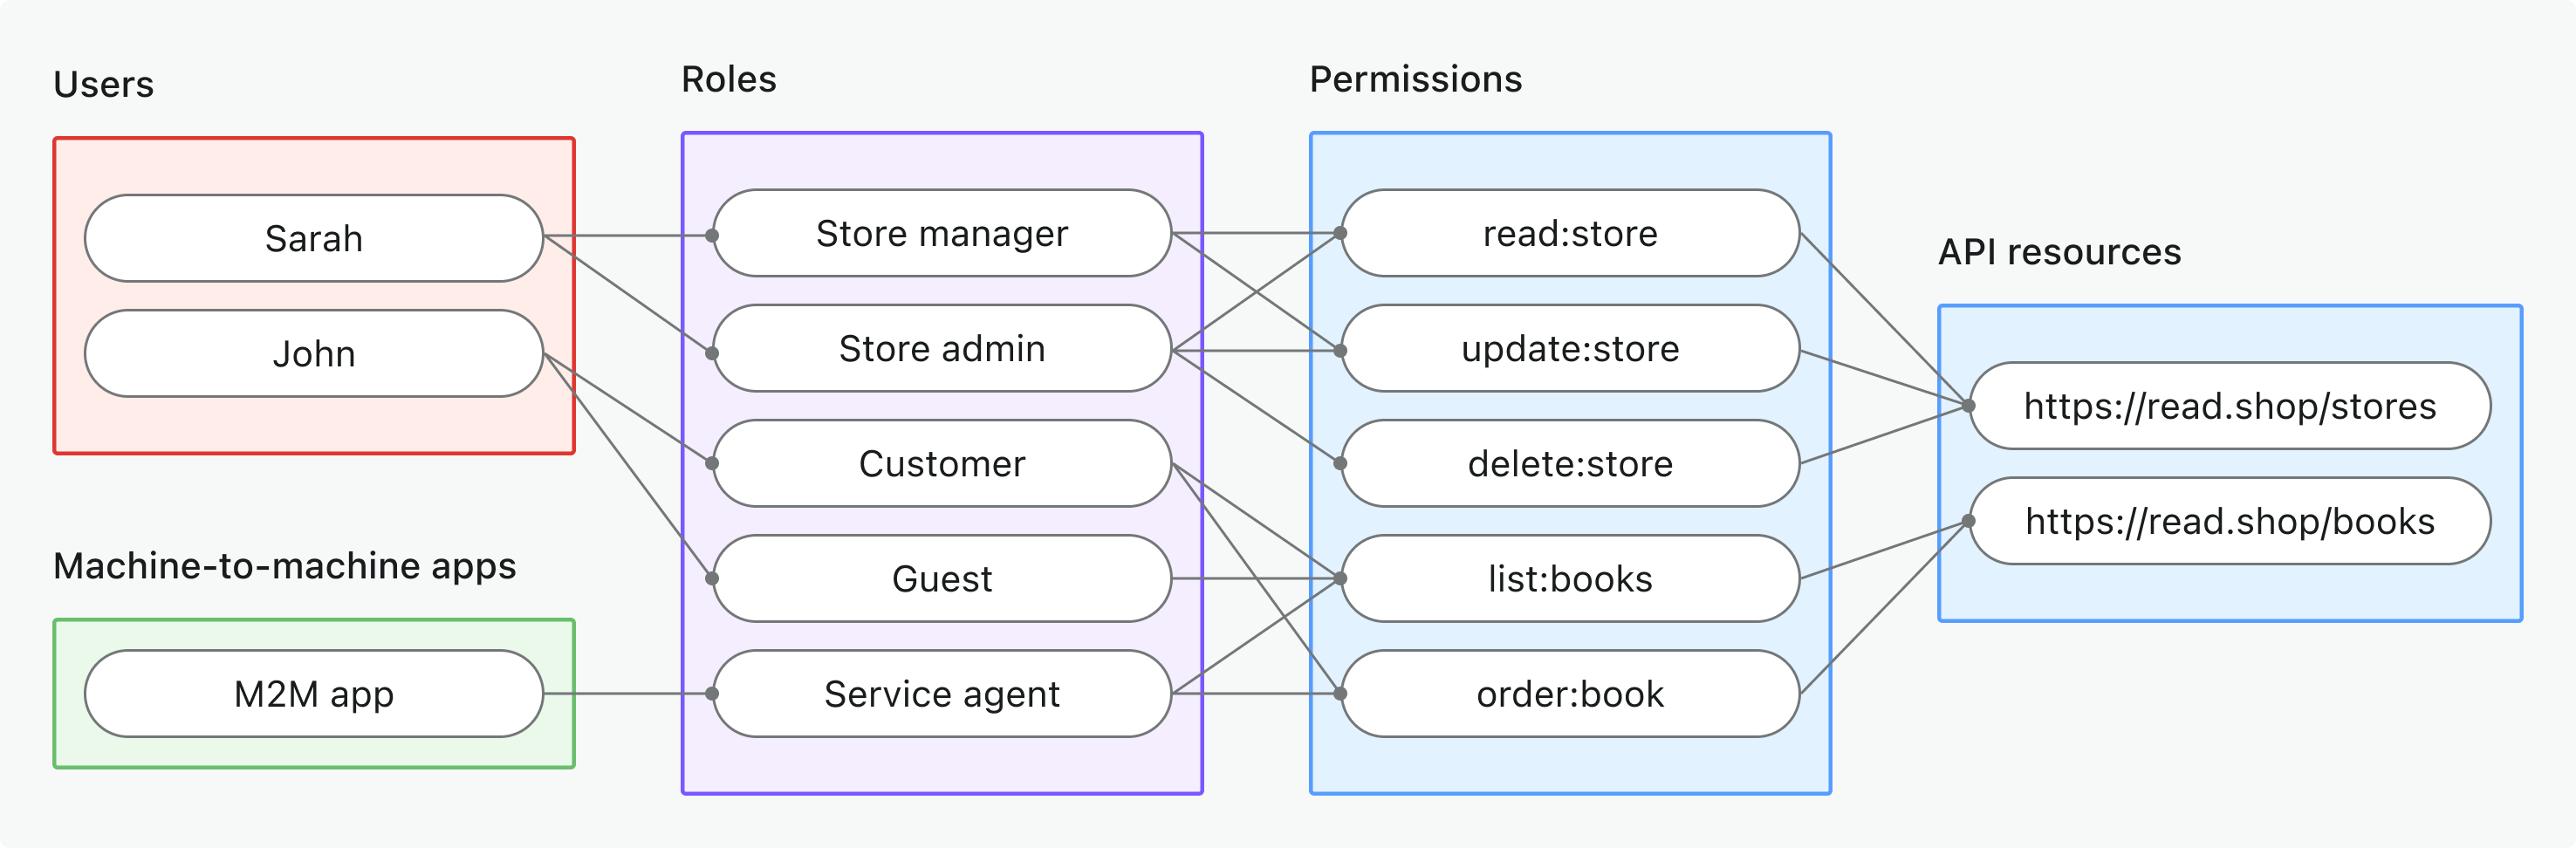
- 適用情境: 保護整個應用程式共用的 API 資源(非組織專屬)
- 權杖類型: 具有全域受眾 (global audience) 的存取權杖 (Access token)
- 範例: 公開 API、核心產品服務、管理端點
- 最適用於: 所有客戶共用 API 的 SaaS 產品、無租戶隔離的微服務架構
- 深入瞭解: 保護全域 API 資源
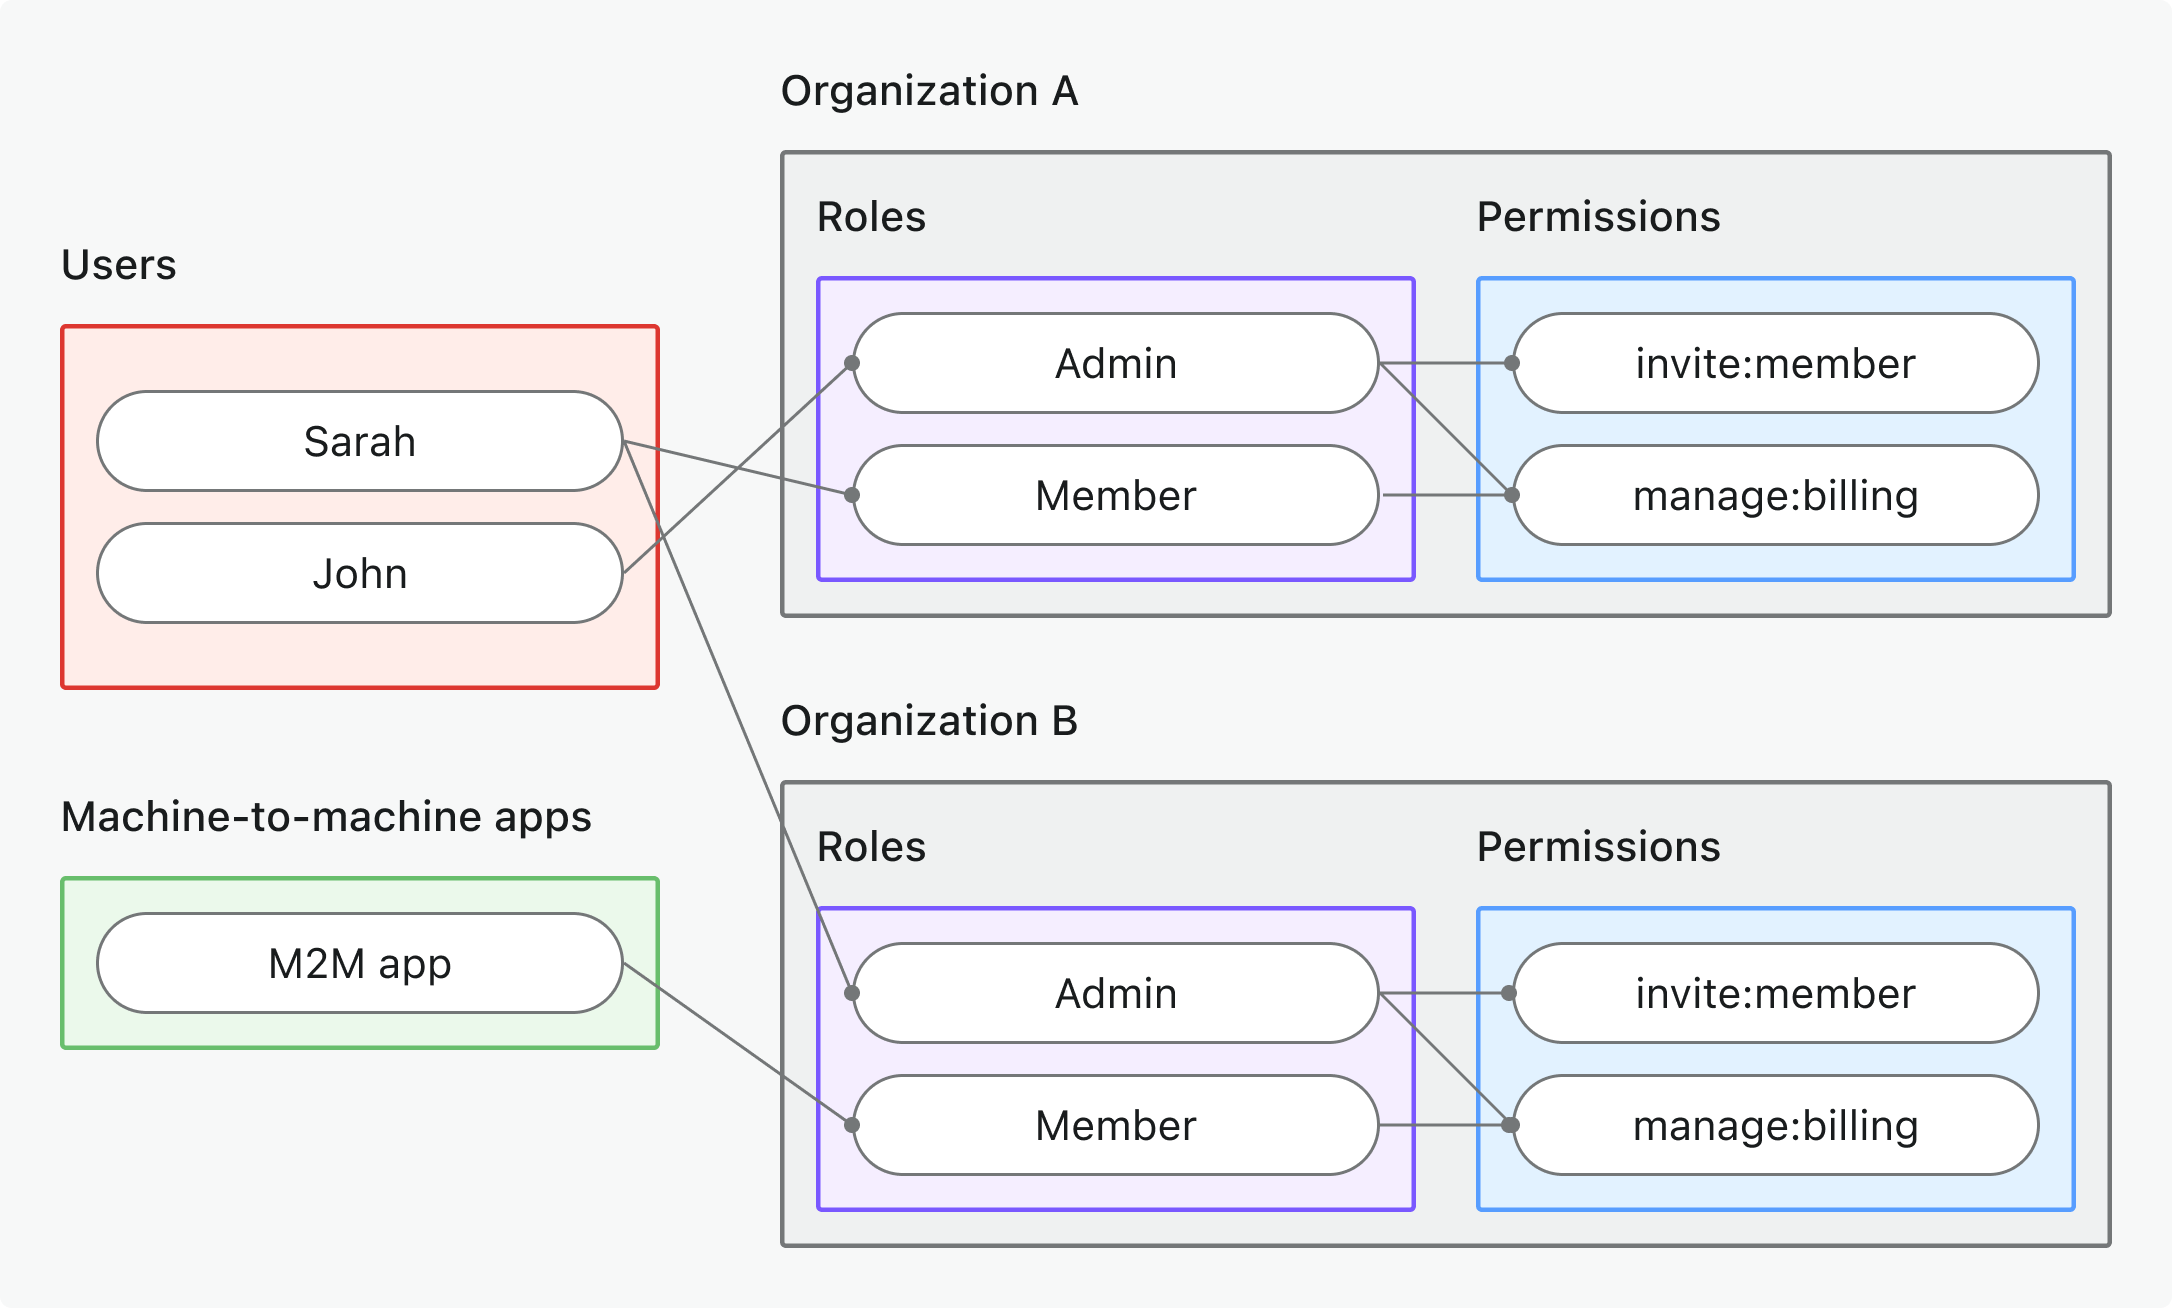
- 適用情境: 控制組織專屬的操作、UI 功能或商業邏輯(非 API)
- 權杖類型: 具有組織專屬受眾 (organization-specific audience) 的組織權杖 (Organization token)
- 範例: 功能開關、儀表板權限、成員邀請控制
- 最適用於: 具有組織專屬功能與流程的多租戶 SaaS
- 深入瞭解: 保護組織(非 API)權限
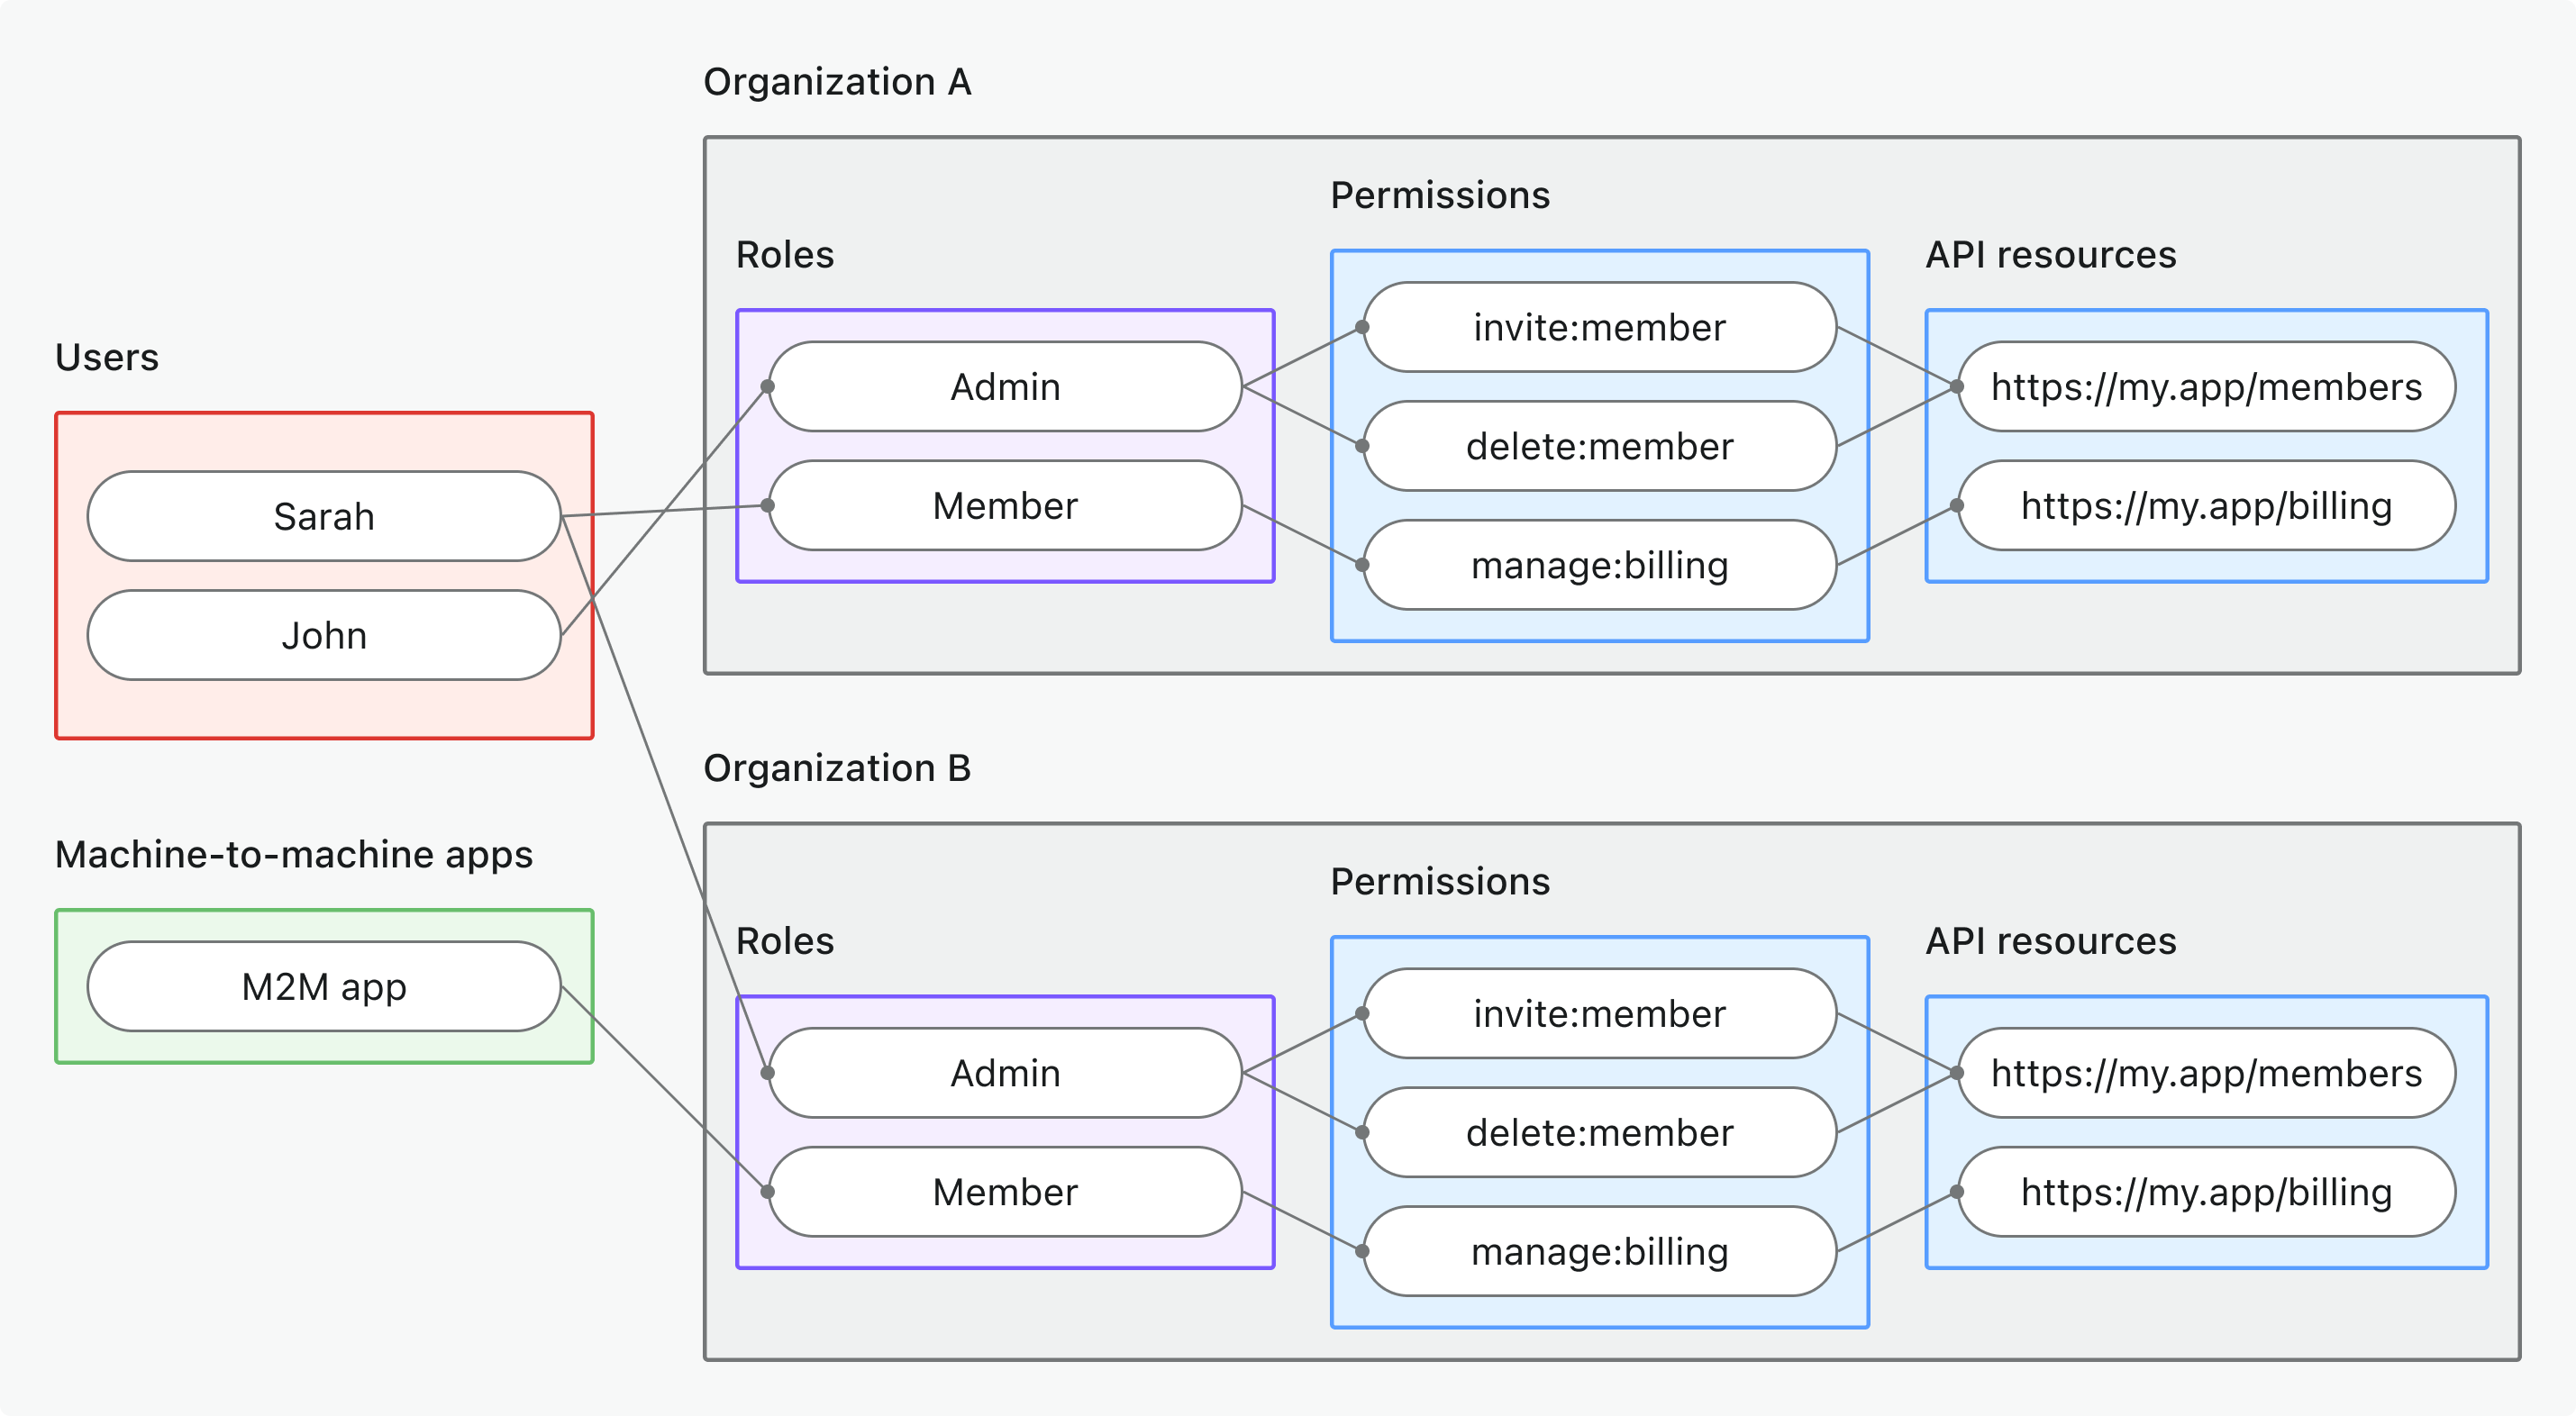
- 適用情境: 保護僅在特定組織情境下可存取的 API 資源
- 權杖類型: 具有 API 資源受眾 (API resource audience) + 組織情境 (organization context) 的組織權杖 (Organization token)
- 範例: 多租戶 API、組織範圍資料端點、租戶專屬微服務
- 最適用於: API 資料以組織為範圍的多租戶 SaaS
- 深入瞭解: 保護組織層級 API 資源
💡 請在繼續前選擇你的模型 —— 本指南後續內容將以你選擇的方式為參考。
快速準備步驟
設定 Logto 資源與權限 (Permissions)
- 全域 API 資源 (Global API resources)
- 組織(非 API)權限 (Organization (non-API) permissions)
- 組織層級 API 資源 (Organization-level API resources)
- 建立 API 資源 (API resource): 前往 Console → API 資源 (API resources) 並註冊你的 API(例如:
https://api.yourapp.com) - 定義權限 (Permissions): 新增如
read:products、write:orders等權限範圍 (Scopes) —— 參考 定義帶有權限的 API 資源 - 建立全域角色 (Global roles): 前往 Console → 角色 (Roles) 並建立包含 API 權限的角色 —— 參考 設定全域角色
- 指派角色 (Assign roles): 將角色指派給需要 API 存取權的使用者或 M2M 應用程式
- 定義組織權限 (Organization permissions): 在組織範本中建立如
invite:member、manage:billing等非 API 組織權限 - 設定組織角色 (Organization roles): 在組織範本中配置組織專屬角色並指派權限給這些角色
- 指派組織角色 (Assign organization roles): 在每個組織情境下將使用者指派到組織角色
- 建立 API 資源 (API resource): 如上註冊你的 API 資源,但將用於組織情境
- 定義權限 (Permissions): 新增如
read:data、write:settings等限定於組織情境的權限範圍 (Scopes) - 設定組織範本 (Configure organization template): 設定包含 API 資源權限的組織角色
- 指派組織角色 (Assign organization roles): 將使用者或 M2M 應用程式指派到包含 API 權限的組織角色
- 多租戶設定 (Multi-tenant setup): 確保你的 API 能處理組織範圍的資料與驗證
建議從我們的 角色型存取控制 (RBAC) 指南 開始,獲得逐步設定說明。
更新你的用戶端應用程式
在用戶端請求適當的權限範圍 (Scopes):
- 使用者驗證 (Authentication):更新你的應用程式 → 以請求你的 API 權限範圍和/或組織情境
- 機器對機器 (M2M):設定 M2M 權限範圍 → 以進行伺服器對伺服器存取
通常需要在用戶端設定中新增以下一項或多項:
- OAuth 流程中的
scope參數 - 用於 API 資源存取的
resource參數 - 組織情境下的
organization_id
請確保你測試的使用者或 M2M 應用程式已被指派包含所需 API 權限的正確角色或組織角色。
初始化你的 API 專案
要初始化新的 .NET Web API 專案,你可以使用 .NET CLI:
dotnet new webapi -n YourApiName
cd YourApiName
新增 JWT 驗證 (Authentication) 所需的 NuGet 套件:
dotnet add package Microsoft.AspNetCore.Authentication.JwtBearer
建立基本的 API 控制器:
using Microsoft.AspNetCore.Mvc;

namespace YourApiName.Controllers
{
    [ApiController]
    [Route("api/[controller]")]
    public class ApiController : ControllerBase
    {
        [HttpGet]
        public IActionResult Get()
        {
            return Ok(new { message = "Hello from .NET API" });
        }
    }
}
啟動開發伺服器:
dotnet run
如需更多有關設定控制器、中介軟體及其他功能的詳細資訊,請參閱 ASP.NET Core 官方文件。
初始化常數與工具函式
在你的程式碼中定義必要的常數與工具函式,以處理權杖(token)的擷取與驗證。一個有效的請求必須包含 Authorization 標頭,格式為 Bearer <存取權杖 (Access token)>。
namespace YourApiNamespace
{
    public static class AuthConstants
    {
        public const string Issuer = "https://your-tenant.logto.app/oidc";
    }
}
namespace YourApiNamespace.Exceptions
{
    public class 授權 (Authorization)Exception : Exception
    {
        public int StatusCode { get; }

        public 授權 (Authorization)Exception(string message, int statusCode = 403) : base(message)
        {
            StatusCode = statusCode;
        }
    }
}
取得你的 Logto 租戶資訊
你需要以下數值來驗證 Logto 發行的權杖:
- JSON Web Key Set (JWKS) URI:Logto 公鑰的網址,用於驗證 JWT 簽章。
- 簽發者 (Issuer):預期的簽發者值(Logto 的 OIDC URL)。
首先,找到你的 Logto 租戶端點。你可以在多個地方找到:
- 在 Logto Console,設定 → 網域。
- 在你於 Logto 配置過的任何應用程式設定中,設定 → 端點與憑證。
從 OpenID Connect 探索端點取得
這些數值可以從 Logto 的 OpenID Connect 探索端點取得:
https://<your-logto-endpoint>/oidc/.well-known/openid-configuration
以下為範例回應(為簡潔省略其他欄位):
{
  "jwks_uri": "https://your-tenant.logto.app/oidc/jwks",
  "issuer": "https://your-tenant.logto.app/oidc"
}
在程式碼中硬編碼(不建議)
由於 Logto 不允許自訂 JWKS URI 或簽發者 (Issuer),你可以將這些數值硬編碼在程式碼中。但這不建議用於正式環境,因為若未來有設定變更,可能會增加維護負擔。
- JWKS URI:
https://<your-logto-endpoint>/oidc/jwks - 簽發者 (Issuer):
https://<your-logto-endpoint>/oidc
驗證權杖與權限
在擷取權杖並取得 OIDC 設定後,請驗證以下項目:
- 簽章 (Signature): JWT 必須有效且由 Logto(透過 JWKS)簽署。
- 簽發者 (Issuer): 必須符合你的 Logto 租戶簽發者。
- 受眾 (Audience): 必須符合在 Logto 註冊的 API 資源標示符 (resource indicator),或在適用時符合組織 (Organization) 上下文。
- 過期時間 (Expiration): 權杖不得過期。
- 權限範圍 (Permissions, scopes): 權杖必須包含 API/操作所需的權限範圍 (scopes)。scopes 會以空格分隔字串出現在
scope宣告 (claim) 中。 - 組織 (Organization) 上下文: 若保護的是組織層級 API 資源,需驗證
organization_id宣告 (claim)。
詳情請參閱 JSON Web Token 以瞭解 JWT 結構與宣告 (claims)。
各權限模型需檢查的項目
不同權限模型下,宣告 (claims) 與驗證規則有所不同:
- 全域 API 資源
- 組織(非 API)權限
- 組織層級 API 資源
- 受眾宣告 (
aud): API 資源標示符 (API resource indicator) - 組織宣告 (
organization_id): 不存在 - 權限範圍需檢查 (
scope): API 資源權限 (API resource permissions)
- 受眾宣告 (
aud):urn:logto:organization:<id>(組織上下文於aud宣告中) - 組織宣告 (
organization_id): 不存在 - 權限範圍需檢查 (
scope): 組織權限 (Organization permissions)
- 受眾宣告 (
aud): API 資源標示符 (API resource indicator) - 組織宣告 (
organization_id): 組織 ID(必須與請求相符) - 權限範圍需檢查 (
scope): API 資源權限 (API resource permissions)
對於非 API 組織權限,組織上下文由 aud 宣告表示 (例如
urn:logto:organization:abc123)。organization_id 宣告僅存在於組織層級 API 資源權杖中。
對於多租戶 API,務必同時驗證權限範圍 (scopes) 及上下文(受眾 (audience)、組織 (organization)),以確保安全。
新增驗證邏輯
新增 JWT 驗證 (Authentication) 所需的 NuGet 套件:
<PackageReference Include="Microsoft.AspNetCore.Authentication.JwtBearer" Version="8.0.0" />
建立驗證服務以處理權杖驗證:
using System.Security.Claims;
using Microsoft.AspNetCore.Authentication.JwtBearer;
using YourApiNamespace.Exceptions;

namespace YourApiNamespace.Services
{
    public interface IJwtValidationService
    {
        Task ValidateTokenAsync(TokenValidatedContext context);
    }

    public class JwtValidationService : IJwtValidationService
    {
        public async Task ValidateTokenAsync(TokenValidatedContext context)
        {
            var principal = context.Principal!;

            try
            {
                // 根據權限 (Permission) 模型新增你的驗證邏輯
                ValidatePayload(principal);
            }
            catch (AuthorizationException)
            {
                throw; // 重新拋出授權 (Authorization) 例外
            }
            catch (Exception ex)
            {
                throw new AuthorizationException($"Token validation failed: {ex.Message}", 401);
            }
        }

        private void ValidatePayload(ClaimsPrincipal principal)
        {
            // 根據權限 (Permission) 模型實作你的驗證邏輯
            // 相關內容會在下方權限 (Permission) 模型章節說明
        }
    }
}
在你的 Program.cs 中設定 JWT 驗證 (Authentication):
using Microsoft.AspNetCore.Authentication.JwtBearer;
using Microsoft.IdentityModel.Tokens;
using YourApiNamespace.Services;
using YourApiNamespace.Exceptions;

var builder = WebApplication.CreateBuilder(args);

// 加入服務到容器
builder.Services.AddControllers();
builder.Services.AddScoped<IJwtValidationService, JwtValidationService>();

// 設定 JWT 驗證 (Authentication)
builder.Services.AddAuthentication(JwtBearerDefaults.AuthenticationScheme)
    .AddJwtBearer(options =>
    {
        options.Authority = AuthConstants.Issuer;
        options.MetadataAddress = $"{AuthConstants.Issuer}/.well-known/openid_configuration";
        options.RequireHttpsMetadata = true;
        options.TokenValidationParameters = new TokenValidationParameters
        {
            ValidateIssuer = true,
            ValidIssuer = AuthConstants.Issuer,
            ValidateAudience = false, // 受眾 (Audience) 驗證將根據權限 (Permission) 模型手動處理
            ValidateLifetime = true,
            ValidateIssuerSigningKey = true,
            ClockSkew = TimeSpan.FromMinutes(5)
        };

        options.Events = new JwtBearerEvents
        {
            OnTokenValidated = async context =>
            {
                var validationService = context.HttpContext.RequestServices
                    .GetRequiredService<IJwtValidationService>();

                await validationService.ValidateTokenAsync(context);
            },
            OnAuthenticationFailed = context =>
            {
                // 將 JWT 函式庫錯誤處理為 401
                context.Response.StatusCode = 401;
                context.Response.ContentType = "application/json";
                context.Response.WriteAsync($"{{\"error\": \"Invalid token\"}}");
                context.HandleResponse();
                return Task.CompletedTask;
            }
        };
    });

builder.Services.AddAuthorization();

var app = builder.Build();

// 驗證 (Authentication) / 授權 (Authorization) 失敗的全域錯誤處理
app.Use(async (context, next) =>
{
    try
    {
        await next();
    }
    catch (AuthorizationException ex)
    {
        context.Response.StatusCode = ex.StatusCode;
        context.Response.ContentType = "application/json";
        await context.Response.WriteAsync($"{{\"error\": \"{ex.Message}\"}}");
    }
});

// 設定 HTTP 請求管線
app.UseAuthentication();
app.UseAuthorization();

app.MapControllers();

app.Run();
根據你的權限 (Permission) 模型,在 JwtValidationService 中實作相應的驗證邏輯:
- 全域 API 資源 (Global API resources)
- 組織(非 API)權限 (Organization (non-API) permissions)
- 組織層級 API 資源 (Organization-level API resources)
private void ValidatePayload(ClaimsPrincipal principal)
{
    // 檢查受眾 (Audience) 宣告是否符合你的 API 資源標示符 (Resource indicator)
    var audiences = principal.FindAll("aud").Select(c => c.Value).ToList();
    if (!audiences.Contains("https://your-api-resource-indicator"))
    {
        throw new AuthorizationException("Invalid audience");
    }

    // 檢查全域 API 資源所需的權限範圍 (Scopes)
    var requiredScopes = new[] { "api:read", "api:write" }; // 請替換為實際所需權限範圍
    var tokenScopes = principal.FindFirst("scope")?.Value?.Split(' ') ?? Array.Empty<string>();

    if (!requiredScopes.All(scope => tokenScopes.Contains(scope)))
    {
        throw new AuthorizationException("Insufficient scope");
    }
}
private void ValidatePayload(ClaimsPrincipal principal)
{
    // 檢查受眾 (Audience) 宣告是否符合組織格式
    var audiences = principal.FindAll("aud").Select(c => c.Value).ToList();
    var hasOrgAudience = audiences.Any(aud => aud.StartsWith("urn:logto:organization:"));

    if (!hasOrgAudience)
    {
        throw new AuthorizationException("Invalid audience for organization permissions");
    }

    // 檢查組織 ID 是否符合上下文(你可能需要從請求上下文取得)
    var expectedOrgId = "your-organization-id"; // 從請求上下文取得
    var expectedAud = $"urn:logto:organization:{expectedOrgId}";
    if (!audiences.Contains(expectedAud))
    {
        throw new AuthorizationException("Organization ID mismatch");
    }

    // 檢查所需的組織權限範圍 (Scopes)
    var requiredScopes = new[] { "invite:users", "manage:settings" }; // 請替換為實際所需權限範圍
    var tokenScopes = principal.FindFirst("scope")?.Value?.Split(' ') ?? Array.Empty<string>();

    if (!requiredScopes.All(scope => tokenScopes.Contains(scope)))
    {
        throw new AuthorizationException("Insufficient organization scope");
    }
}
private void ValidatePayload(ClaimsPrincipal principal)
{
    // 檢查受眾 (Audience) 宣告是否符合你的 API 資源標示符 (Resource indicator)
    var audiences = principal.FindAll("aud").Select(c => c.Value).ToList();
    if (!audiences.Contains("https://your-api-resource-indicator"))
    {
        throw new AuthorizationException("Invalid audience for organization-level API resources");
    }

    // 檢查組織 ID 是否符合上下文(你可能需要從請求上下文取得)
    var expectedOrgId = "your-organization-id"; // 從請求上下文取得
    var orgId = principal.FindFirst("organization_id")?.Value;
    if (!expectedOrgId.Equals(orgId))
    {
        throw new AuthorizationException("Organization ID mismatch");
    }

    // 檢查組織層級 API 資源所需的權限範圍 (Scopes)
    var requiredScopes = new[] { "api:read", "api:write" }; // 請替換為實際所需權限範圍
    var tokenScopes = principal.FindFirst("scope")?.Value?.Split(' ') ?? Array.Empty<string>();

    if (!requiredScopes.All(scope => tokenScopes.Contains(scope)))
    {
        throw new AuthorizationException("Insufficient organization-level API scopes");
    }
}
套用中介軟體至你的 API
現在,將中介軟體套用到你受保護的 API 路由。
我們已在前述章節設定好驗證 (Authentication) 與授權 (Authorization) 中介軟體。現在可以建立一個受保護的控制器,用來驗證存取權杖 (Access token) 並從已驗證的請求中擷取宣告 (Claims)。
using Microsoft.AspNetCore.Authorization;
using Microsoft.AspNetCore.Mvc;
using System.Security.Claims;

namespace YourApiNamespace.Controllers
{
    [ApiController]
    [Route("api/[controller]")]
    [Authorize] // 此控制器所有動作皆需驗證 (Authentication)
    public class ProtectedController : ControllerBase
    {
        [HttpGet]
        public IActionResult GetProtectedData()
        {
            // 直接從 User 宣告 (Claims) 取得存取權杖 (Access token) 資訊
            var sub = User.FindFirst(ClaimTypes.NameIdentifier)?.Value ?? User.FindFirst("sub")?.Value;
            var clientId = User.FindFirst("client_id")?.Value;
            var organizationId = User.FindFirst("organization_id")?.Value;
            var scopes = User.FindFirst("scope")?.Value?.Split(' ') ?? Array.Empty<string>();
            var audience = User.FindAll("aud").Select(c => c.Value).ToArray();

            return Ok(new {
                sub,
                client_id = clientId,
                organization_id = organizationId,
                scopes,
                audience
            });
        }

        [HttpGet("claims")]
        public IActionResult GetAllClaims()
        {
            // 回傳所有宣告 (Claims) 以便除錯 / 檢查
            var claims = User.Claims.Select(c => new { c.Type, c.Value }).ToList();
            return Ok(new { claims });
        }
    }
}
測試你的受保護 API
取得存取權杖 (Access tokens)
從你的用戶端應用程式取得: 如果你已完成用戶端整合,你的應用程式可以自動取得權杖。擷取存取權杖 (Access token) 並在 API 請求中使用。
使用 curl / Postman 測試:
-
使用者權杖 (User tokens): 使用你的用戶端應用程式的開發者工具,從 localStorage 或網路分頁複製存取權杖 (Access token)
-
機器對機器權杖 (Machine-to-machine tokens): 使用 client credentials flow。以下是使用 curl 的非標準範例:
curl -X POST https://your-tenant.logto.app/oidc/token \
  -H "Content-Type: application/x-www-form-urlencoded" \
  -d "grant_type=client_credentials" \
  -d "client_id=your-m2m-client-id" \
  -d "client_secret=your-m2m-client-secret" \
  -d "resource=https://your-api-resource-indicator" \
  -d "scope=api:read api:write"
你可能需要根據你的 API 資源 (API resource) 和權限 (Permissions) 調整
resource和scope參數;如果你的 API 以組織 (Organization) 為範圍,也可能需要organization_id參數。
需要檢查權杖內容嗎?請使用我們的 JWT 解碼工具 來解碼並驗證你的 JWT。
測試受保護端點
有效權杖請求
curl -H "Authorization: Bearer eyJhbGciOiJSUzI1NiIsInR5cCI6IkpXVCJ9..." \
  http://localhost:3000/api/protected
預期回應:
{
  "auth": {
    "sub": "user123",
    "clientId": "app456",
    "organizationId": "org789",
    "scopes": ["api:read", "api:write"],
    "audience": ["https://your-api-resource-indicator"]
  }
}
缺少權杖
curl http://localhost:3000/api/protected
預期回應 (401):
{
  "error": "Authorization header is missing"
}
無效權杖
curl -H "Authorization: Bearer invalid-token" \
  http://localhost:3000/api/protected
預期回應 (401):
{
  "error": "Invalid token"
}
權限模型專屬測試
- 全域 API 資源 (Global API resources)
- 組織(非 API)權限 (Organization (non-API) permissions)
- 組織層級 API 資源 (Organization-level API resources)
針對以全域權限範圍 (Scopes) 保護的 API 測試情境:
- 有效權限範圍 (Valid scopes): 使用包含所需 API 權限範圍(如
api:read、api:write)的權杖測試 - 缺少權限範圍 (Missing scopes): 權杖缺少必要權限範圍時,預期回傳 403 Forbidden
- 錯誤受眾 (Wrong audience): 權杖受眾 (Audience) 不符合 API 資源時,預期回傳 403 Forbidden
# 權杖缺少必要權限範圍 - 預期 403
curl -H "Authorization: Bearer token-without-required-scopes" \
  http://localhost:3000/api/protected
針對組織專屬存取控制的測試情境:
- 有效組織權杖 (Valid organization token): 使用包含正確組織 (Organization) 資訊(組織 ID 與權限範圍)的權杖測試
- 缺少權限範圍 (Missing scopes): 使用者沒有執行請求操作的權限時,預期回傳 403 Forbidden
- 錯誤組織 (Wrong organization): 權杖受眾 (Audience) 不符合組織上下文(
urn:logto:organization:<organization_id>)時,預期回傳 403 Forbidden
# 錯誤組織的權杖 - 預期 403
curl -H "Authorization: Bearer token-for-different-organization" \
  http://localhost:3000/api/protected
結合 API 資源驗證與組織上下文的測試情境:
- 有效組織 + API 權限範圍 (Valid organization + API scopes): 權杖同時具備組織上下文與所需 API 權限範圍時測試
- 缺少 API 權限範圍 (Missing API scopes): 組織權杖缺少必要 API 權限時,預期回傳 403 Forbidden
- 錯誤組織 (Wrong organization): 使用不同組織的權杖存取 API 時,預期回傳 403 Forbidden
- 錯誤受眾 (Wrong audience): 權杖受眾 (Audience) 不符合組織層級 API 資源時,預期回傳 403 Forbidden
# 組織權杖缺少 API 權限範圍 - 預期 403
curl -H "Authorization: Bearer organization-token-without-api-scopes" \
  http://localhost:3000/api/protected
延伸閱讀
RBAC 實務應用:為你的應用程式實現安全授權 (Authorization)
建立多租戶 SaaS 應用程式:從設計到實作的完整指南